Alias-Agent (short for Alias) is an LLM-empowered agent built on AgentScope and AgentScope-runtime, designed as a general-purpose intelligent assistant. Alias excels at decomposing complicated problems, constructing roadmaps, and applying appropriate strategies to tackle diverse real-world tasks. Alias employs five operational modes: General, Browser Use, Deep Research, Financial Analysis, and Data Science. Each mode comes with tailored instructions, specialized tool sets, and the capability to orchestrate expert agents, enabling Alias to serve both as an out-of-the-box solution and a foundational template for custom development.
Alias-Agent Logo
Alias employs five operational modes — each with tailored instructions, specialized tool sets, and the capability to orchestrate expert agents:

General

Meta Planner with automatic mode switching
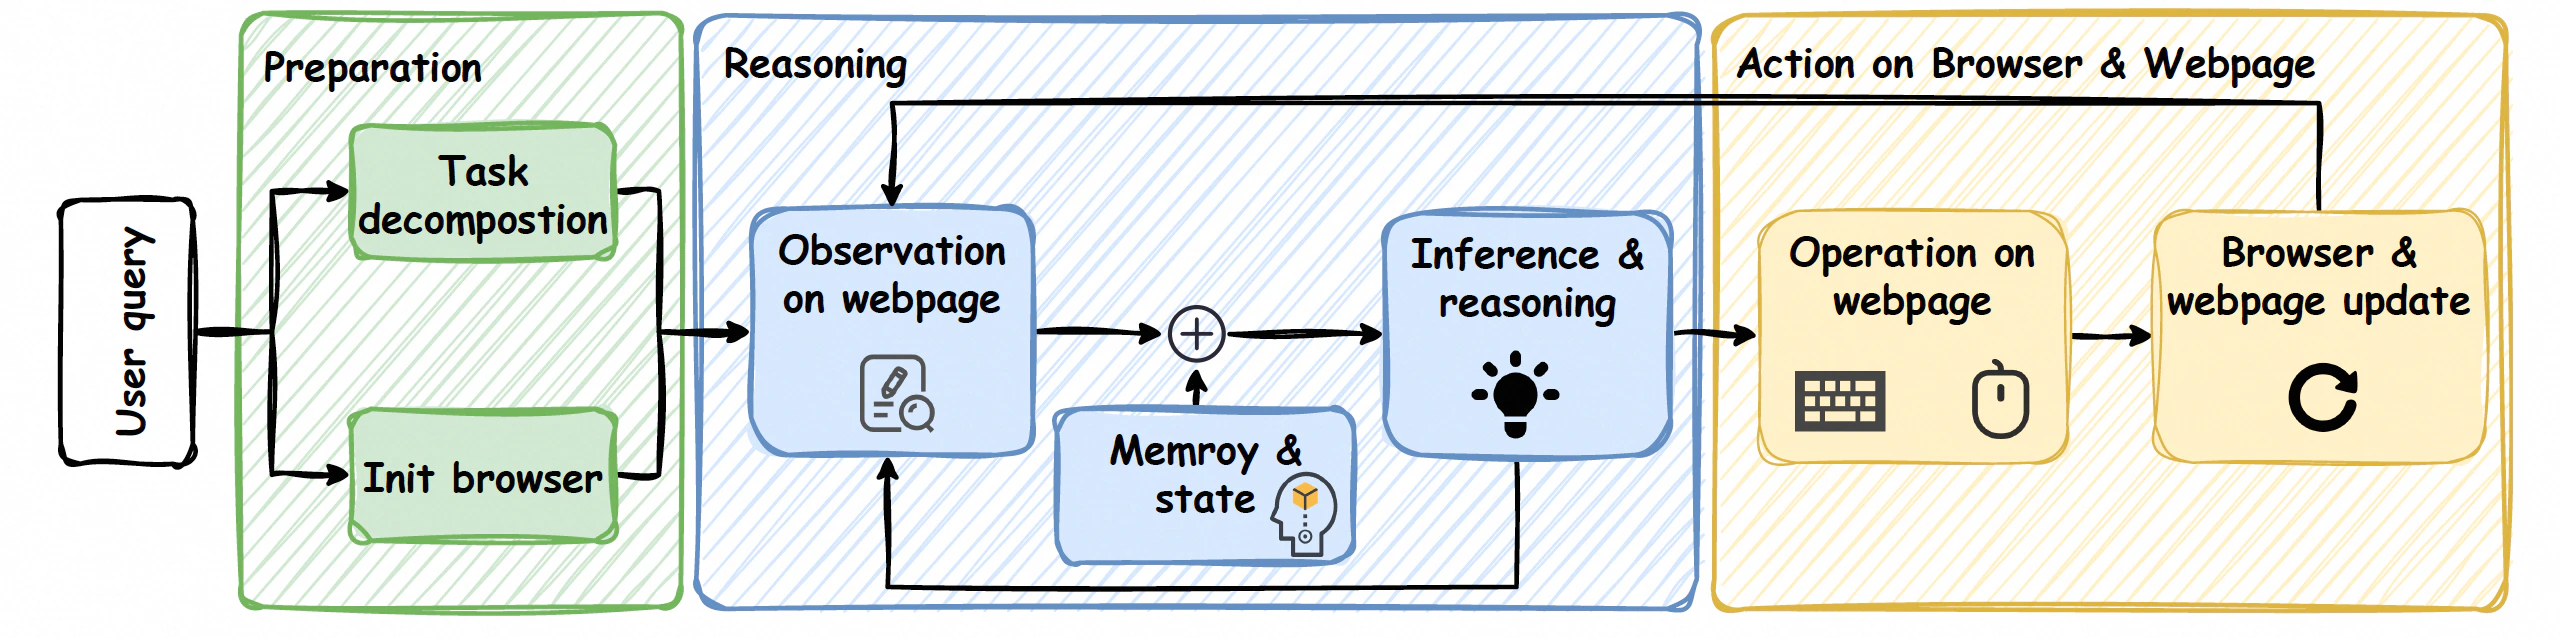
Browser Use

Multimodal web automation
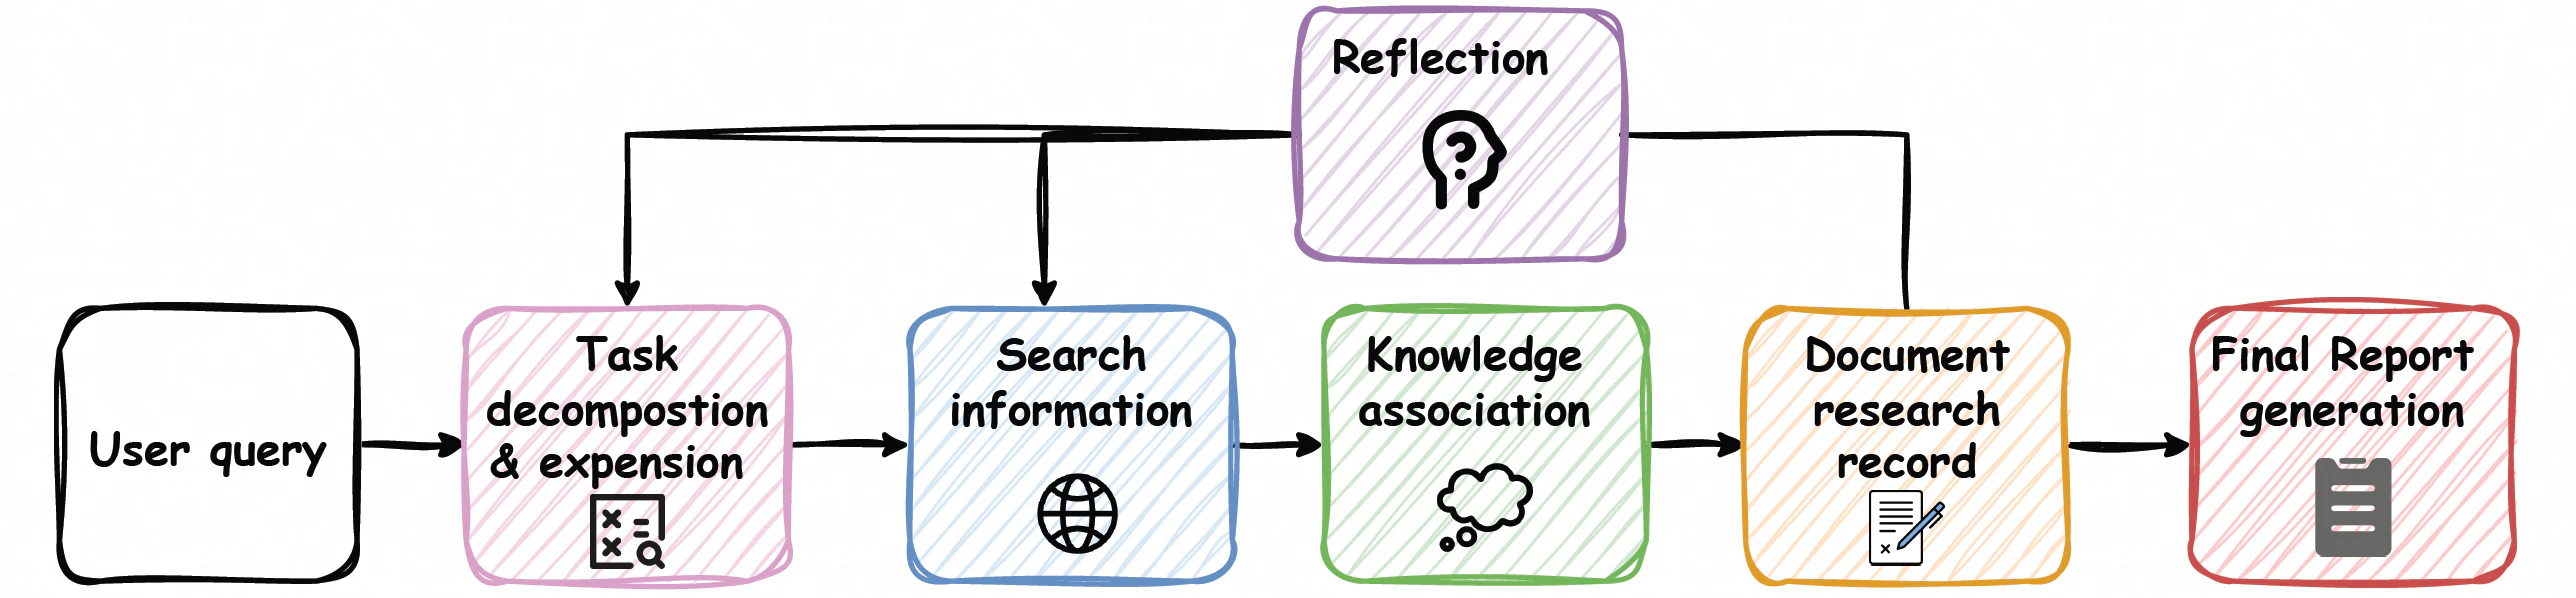
Deep Research

Tree-structured research with user steering
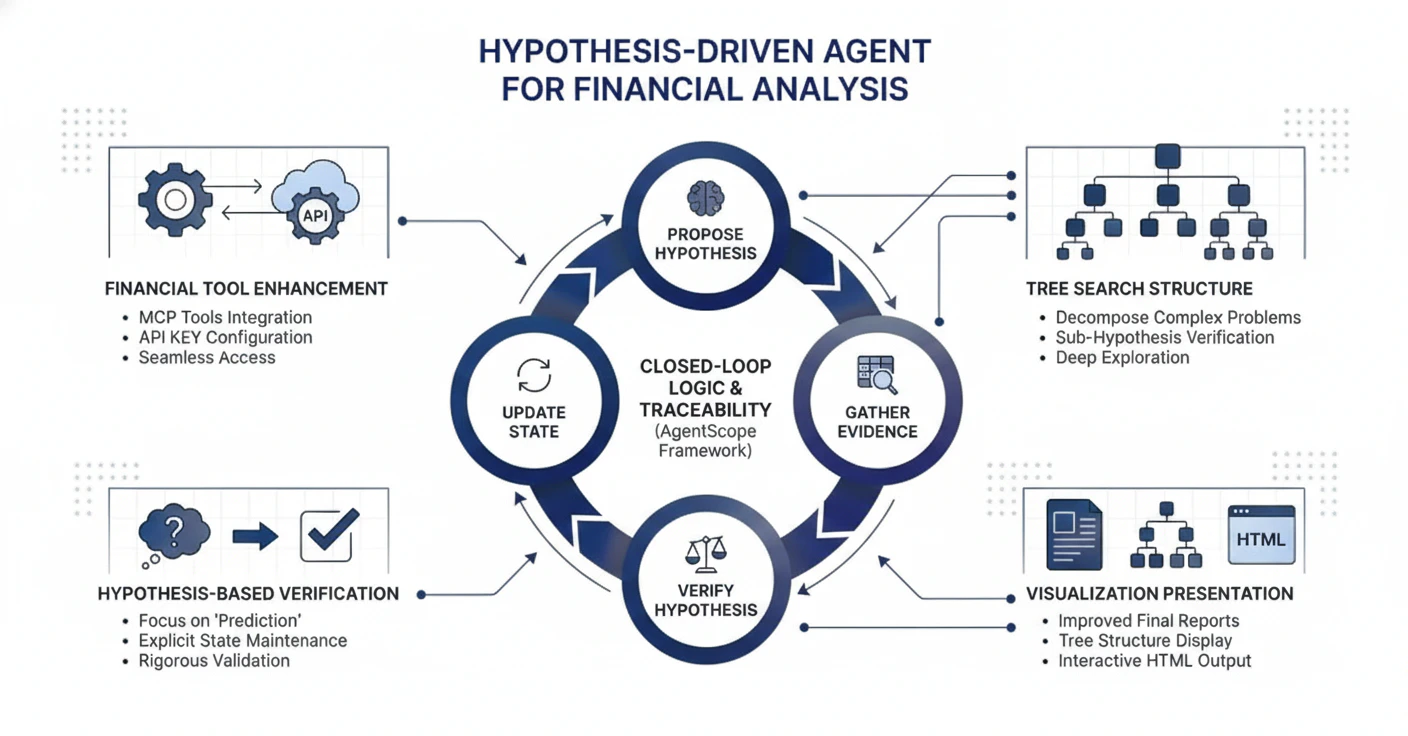
Financial Analysis

Hypothesis-driven financial reasoning
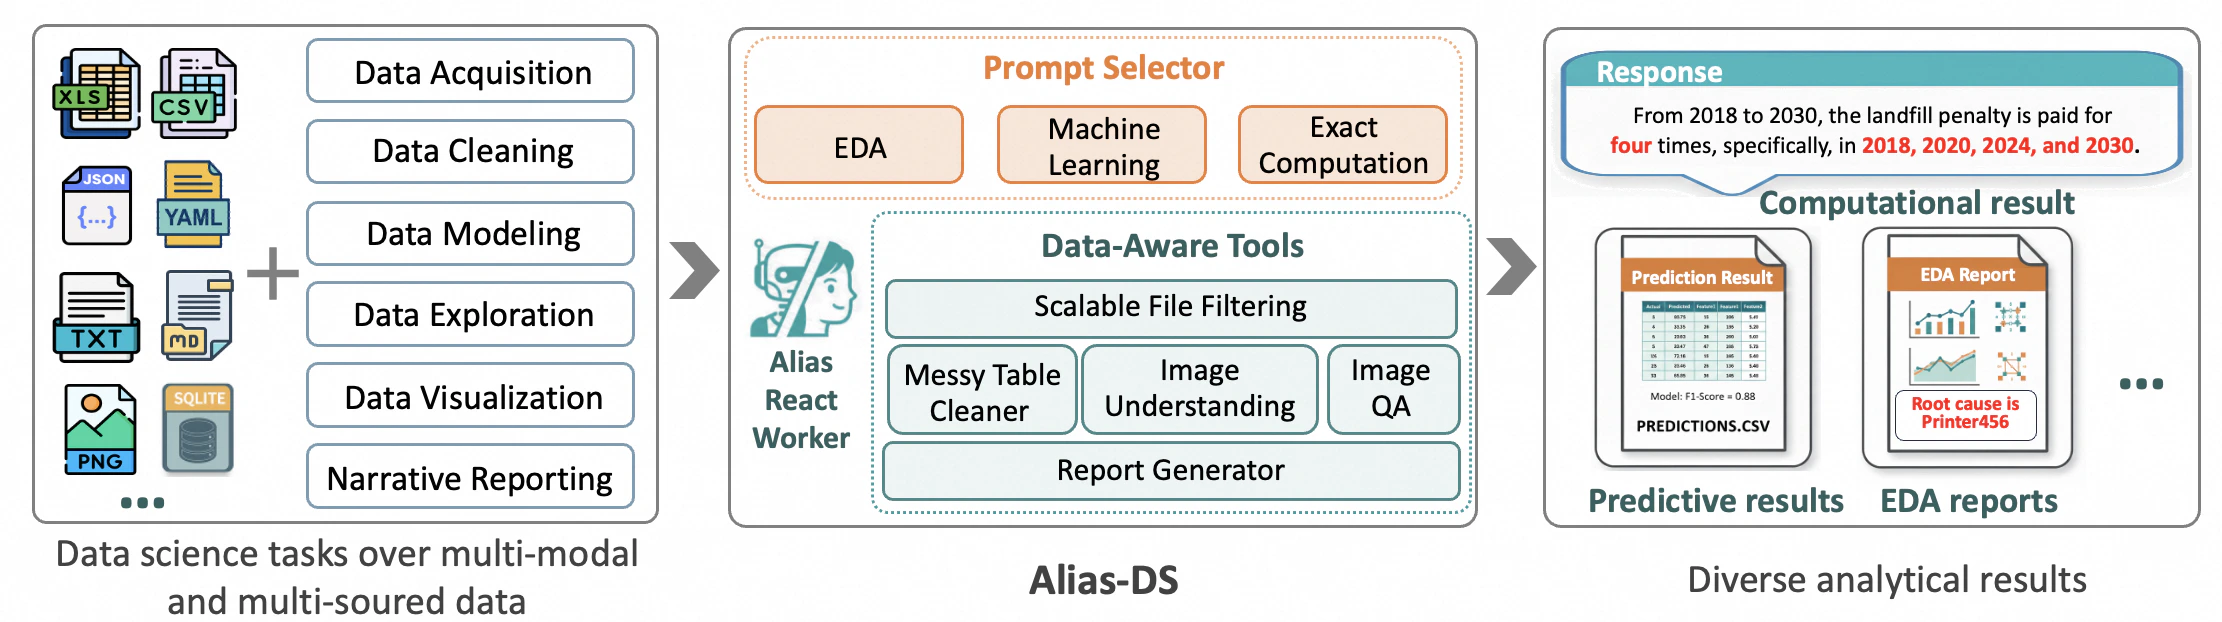
Data Science

End-to-end autonomous data analysis

Features

Various Operational Modes for Diverse Scenarios

General Mode

The General mode features the Meta Planner, which orchestrates task execution with automatic mode switching and interrupt support, intelligently routing tasks to specialized agents while maintaining state preservation throughout execution. It also provides an out-of-the-box AgentScope QA Agent, pre-configured with high-frequency Q&A pairs. By integrating RAG and GitHub MCP tools, it dynamically retrieves the latest source code, tutorials, and community discussions, combined with a private knowledge base.

Browser Use Mode

Browser Use Mode
The Browser Use mode extends the browser-use agent with multimodal capabilities: advanced image/chart understanding, video comprehension, automated table filling, and intelligent file download. It also features dynamic subtask management that automatically updates subtasks as web pages change, maintaining context across complex multi-step interactions.

Deep Research Mode

Deep Research Mode
The Deep Research mode introduces user-centric enhancements that transform research tasks into collaborative, transparent processes. It features a pre-search module that gathers background information before generating follow-up questions, and a tree-structure research process driven by iterative information gathering. Users can dynamically interrupt and steer the research direction. The consolidated execution path provides a unified codebase with configurable prompts, SOPs, and toolkits allow adaptation across domains.

Financial Analysis Mode

Financial Analysis Mode
In financial analysis scenarios, complex reasoning and traceable logic chains are crucial for building user trust in model conclusions. The Financial Analysis Mode adopts a hypothesis-driven architecture — “propose hypothesis → collect evidence → verify hypothesis → update state” — to achieve explainability, traceability, and intervenability. Supports tree-structured search for complex sub-hypothesis decomposition, integrates financial MCP tools (configurable API keys), and produces interactive HTML reports with full tree-search visualization.

Data Science Mode

Data Science Mode overview
In Data Science mode, Alias-Agent serves as an autonomous end-to-end assistant covering the full pipeline from data acquisition and cleaning to modeling, visualization, and reporting. An intelligent router assigns tasks to one of three scenarios: EDA, Predictive Modeling, or Exact Data Computation. Key features include: scalable file filtering for large data lakes, robust parsing of irregular spreadsheets (merged cells, multi-level headers), multimodal understanding, and auto-generated interactive HTML reports for EDA tasks.

Enhanced Memory System

  • Tool Memory (Long-term): Persistent storage for tool invocation traces via ReMe, enabling automated summarization and usage guidance.
  • User Profiling (Long-term): Captures and refines user behavior through dynamic candidate scoring and promotion to stable profiles via mem0, seamlessly integrated with frontend interactions.

CLI & Full-Stack Deployment Available

CLI Deployment

  • Command-Line Interface: Direct execution via alias_agent run command with mode selection and configuration options.

Full-Stack Deployment

  • Frontend: Spark Design-based React application with runtime interrupt controls, artifact inspectors, and editable outputs.
  • Backend: Lightweight single-node deployment on AgentScope-runtime with simplified user management and mode-specific bootstrapping.

Quickstart

Installation

Alias requires Python 3.10 or higher.
First, install the package in development mode to set up the alias_agent command-line tool.
# From the project root directory
pip install -e .

Sandbox Setup (Optional)

# If using colima
export DOCKER_HOST=unix://$HOME/.colima/default/docker.sock

# Option 1: Pull from enterprise registry
export RUNTIME_SANDBOX_REGISTRY=agentscope-registry.ap-southeast-1.cr.aliyuncs.com
docker pull agentscope-registry.ap-southeast-1.cr.aliyuncs.com/agentscope/runtime-sandbox-alias:latest

# Option 2: Pull from Docker Hub
docker pull agentscope/runtime-sandbox-alias:latest
More details can refer to AgentScope Runtime documentation.

API Keys Configuration

# Required: Model API key (default: DashScope)
export DASHSCOPE_API_KEY=your_dashscope_api_key_here

# Required: Search API key (for Deep Research mode)
export TAVILY_API_KEY=your_tavily_api_key_here

# Optional: Finance MCP Tools API key (for Financial Analysis mode). Activate MCP tools at:
#  https://bailian.console.aliyun.com/tab=app#/mcp-market/detail/Qieman
# https://bailian.console.aliyun.com/tab=app#/mcp-market/detail/tendency-software
export DASHSCOPE_MCP_API_KEY=your_dashscope_api_key_here


# Optional: GitHub token (for QA Agent to access GitHub repositories)
# export GITHUB_TOKEN=your_github_token

# Optional: Using other models (e.g., OpenAI)
# First, add your model to MODEL_FORMATTER_MAPPING in alias/agent/run.py
# export MODEL=gpt-4
# export OPENAI_API_KEY=your_openai_api_key_here

Basic Usage — CLI Deployment

Execute an agent task with different modes:
# General mode
alias_agent run --mode general --task "Analyze Meta stock performance in Q1 2025"

# Browser Use mode
alias_agent run --mode browser --task "Search five latest research papers about browser-use agent"

# Deep Research mode
alias_agent run --mode dr --task "Research the impact of AI on healthcare"

# Financial Analysis mode
alias_agent run --mode finance --task "Analyze Tesla's Q4 2024 financial performance"

# Data Science mode
alias_agent run --mode ds \
  --task "Analyze the distribution of incidents across categories in 'incident_records.csv' to identify imbalances, inconsistencies, or anomalies, and determine their root cause." \
  --datasource ./docs/data/incident_records.csv

Input/Output Management

Input:
  • Use the --datasource parameter (with aliases --files for backward compatibility) to specify data sources, supporting multiple formats:
    • Local files: such as ./data.txt or /absolute/path/file.json
    • Database DSN: supports relational databases like PostgreSQL and SQLite, with format like postgresql://user:password@host:port/database
Data sources are automatically profiled and uploaded files are copied to /workspace in the sandbox.
Output:
  • Generated files are stored in subdirectories of sessions_mount_dir, where all output results can be found.

Enable Long-Term Memory Service (General Mode Only)

To enable the long-term memory service in General mode, you need to:
  1. Start the Memory Service first (see Start the Memory Service Server section below)
  2. Use the --use_long_term_memory flag when running in General mode:
# General mode with long-term memory service enabled
alias_agent run --mode general --task "Analyze Meta stock performance in Q1 2025" --use_long_term_memory
Long-term memory is disabled by default, only available in General mode, and requires the memory service to be running beforehand.

Basic Usage — Full-Stack Deployment

To run Alias-Agent with the full-stack deployment (frontend + backend), follow these steps:

Prerequisites

  1. Install Frontend Dependencies:
# From the project root directory
cd frontend
npm install
  1. Configure Environment Variables:
# From the project root directory, copy the example environment file
cp .env.example .env

# Edit .env and configure the following key variables:
# - USER_PROFILING_BASE_URL: Memory Service URL (e.g., http://localhost:6380/alias_memory_service)
# - REDIS_HOST: Redis host (default: localhost)
# - REDIS_PORT: Redis port (default: 6379)
# - BACKEND_PORT: Backend server port (default: 8000)
# - FIRST_SUPERUSER_EMAIL: Initial admin email (default: alias@agentscope.com)
# - FIRST_SUPERUSER_USERNAME: Initial admin username (default: alias)
# - FIRST_SUPERUSER_PASSWORD: Initial admin password (default: alias)
  1. Start Redis (required for caching and session management):
# Using Docker (recommended)
docker run -d -p 6379:6379 --name alias-redis redis:7-alpine

# Or using local Redis installation
redis-server
For full functionality including code execution and file operations, start the sandbox server in another terminal:
# From the project root directory
runtime-sandbox-server --extension src/alias/runtime/alias_sandbox/alias_sandbox.py

Start the Backend Server

In a terminal, first export all required API Keys (see API Keys Configuration section above) and then start the backend API server:
python -m uvicorn alias.server.main:app --host 0.0.0.0 --port 8000 --reload
The backend auto-initializes the database, creates the superuser, and starts on http://localhost:8000. You can verify the server is running by visiting http://localhost:8000/api/v1/health.

Start the Frontend

In a separate terminal, start the frontend development server:
# From the project root directory
cd frontend
npm run dev
The frontend will start on http://localhost:5173 (or the port specified in vite.config.ts). The frontend is configured to proxy API requests to the backend server at http://localhost:8000.

Start the Memory Service Server

The Memory Service is required if you want to enable long-term memory features in General mode. Make sure to start the Memory Service before using the --use_long_term_memory flag in CLI or setting use_long_term_memory_service: true in API requests.
First install the Memory Service package in development mode
# From the project root directory
cd src/alias/memory_service
pip install -e .
To use the Memory Service, you have two deployment options: Option 1: Command Line Startup
  1. First, add the following environment variables to your .env file:
# Redis Configuration
USER_PROFILING_REDIS_SERVER=localhost
USER_PROFILING_REDIS_PORT=6379

# Qdrant Configuration
QDRANT_HOST=localhost
QDRANT_PORT=6333
QDRANT_EMBEDDING_MODEL_DIMS=1536

# DashScope Configuration
DASHSCOPE_EMBEDDER=text-embedding-v4
DASHSCOPE_MODEL_4_MEMORY=qwen3-max
DASHSCOPE_API_KEY=your_dashscope_api_key_here
DASHSCOPE_API_BASE_URL=https://dashscope.aliyuncs.com/compatible-mode/v1

# User Profiling Configuration
USER_PROFILING_BASE_URL=http://localhost:6382
USER_PROFILING_SERVICE_PORT=6382
  1. Then run the startup script:
# From the project root directory
bash script/start_memory_service.sh
The script will automatically check and start Redis and Qdrant services (via Docker if available) before starting the memory service. Option 2: Docker Deployment For Docker-based deployment, please refer to the detailed documentation at Detailed Docs.

Access the Application

Once both servers are running:
  • Frontend UI: Open http://localhost:5173 in your browser
  • Backend API: Available at http://localhost:8000
  • API Documentation: Available at http://localhost:8000/docs (Swagger UI) or http://localhost:8000/api/v1/openapi.json (OpenAPI JSON)
  • Health Check: http://localhost:8000/api/v1/health

Default Login Credentials

After the first startup, you can log in with the superuser credentials configured in .env:
  • Email: As specified in FIRST_SUPERUSER_EMAIL (default: alias@agentscope.com)
  • Username: As specified in FIRST_SUPERUSER_USERNAME (default: alias)
  • Password: As specified in FIRST_SUPERUSER_PASSWORD

Basic Usage — AgentScope Runtime Deployment

1. Prerequisites

  • Sandbox & API Keys: Please refer to the previous sections Sandbox Setup and API Keys Configuration to complete the basic environment setup.
  • Environment Variables: Copy the example environment file from the project root:
    cp .env.example .env
    
  • Start Redis: Required for caching and session management:
    docker run -d -p 6379:6379 --name alias-redis redis:7-alpine
    

2. Installation & Sandbox Launch

# From the project root directory
pip install -e .
# In a separate terminal:

3. Launching AgentScope Runtime Service

Option A: Using CLI (Recommended)
Use the alias_agent_runtime command to launch the backend service with one click:
alias_agent_runtime --host 127.0.0.1 --port 8090 --chat-mode general
Parameter Descriptions:
  • --host / --port: Specify the service address and port (default port is 8090).
  • --chat-mode: Set the running mode. Options: general, dr, browser, ds, finance (default: general).
  • --web-ui: (Optional) Enable AgentScope Runtime WebUI for a visual interaction interface. Skip this if you only need the API.
When enabling --web-ui for the first time, the system will automatically install necessary frontend dependencies. This may take a few minutes.
Option B: Using Python Code (Recommended for Developers)
from agentscope_runtime.engine.app import AgentApp
from alias.server.runtime.runner.alias_runner import AliasRunner

# 1. Initialize AliasRunner
# default_chat_mode options: "general", "dr", "browser", "ds", "finance"
runner = AliasRunner(
    default_chat_mode="general",
)

# 2. Create AgentApp instance
agent_app = AgentApp(
    runner=runner,
    app_name="Alias",
    app_description="An LLM-empowered agent built on AgentScope and AgentScope-Runtime",
)

# 3. Run the service
# Set web_ui=True to enable the visual debugging interface
agent_app.run(host="127.0.0.1", port=8090)

4. Accessing the Application

Once the service is running, you can access Alias via:
  • Runtime API Access: Send standard HTTP POST requests to http://localhost:8090/process. This is the primary method for integrating Alias into third-party frontends or backend workflows.
  • Visual Monitoring (Optional): If started with the --web-ui flag, visit http://localhost:5173. This interface allows developers to observe the agent’s reasoning process, tool execution traces, and other debugging information.