> ## Documentation Index
> Fetch the complete documentation index at: https://docs.agentscope.io/llms.txt
> Use this file to discover all available pages before exploring further.
# MCP 中心
> 让用户从一个来源安装 MCP 服务,并配置自己的凭证。
MCP 中心是一个 [MCP](/versions/2.0.6dev/zh/building-blocks/tool/mcp) 服务的目录,用户可以在应用内浏览并安装。注册之后,没有人需要手写 MCP 配置,目录中新增了条目也无需重新部署。
安装并不等于装配给智能体。安装只是把该服务加入用户自己的 MCP 资源池,装配是另一个独立步骤:
用户选中一个服务,填写它所要求的信息,它便加入用户的资源池。所有中心汇入同一个资源池,装完之后就不必再关心它来自哪个来源。
在会话中,用户从资源池里挑选,把该服务加入这个智能体的 [工作区](/versions/2.0.6dev/zh/deploy/workspace-manager),其工具随即对智能体可见。
把两步拆开,凭证才成为一次性成本:API 密钥在安装时填一次,之后把这个服务装配到十个工作区都不会再问第二次。资源池属于用户,因此也不会随某次会话结束而消失。
## 内置的 MCP 中心
AgentScope 目前内置一个 MCP 中心,其他来源都可以通过 [自定义 MCP 中心](#自定义-mcp-中心) 接入:
| 类 | 来源 | 说明 |
| -------------- | --------------------------------------------- | ------------------------------------------- |
| `GitHubMCPHub` | [GitHub MCP Registry](https://github.com/mcp) | GitHub 官方的公开 MCP 服务目录。匿名即可访问,配置令牌可提高调用频率上限。 |
| *即将支持* | — | 更多来源正在接入中。 |
`GitHubMCPHub` 不传任何参数即可使用,下列字段均有默认值:
```python 配置 GitHubMCPHub theme={null}
from agentscope.app.hub import GitHubMCPHub
hub = GitHubMCPHub(
# 用于接口路径和前端 URL,重启前后必须保持不变。
hub_id="github",
# 显示在前端的中心切换列表中。
display_name="GitHub MCP Registry",
# 可选令牌。匿名请求同样可用,只是有频率限制。
api_token=None,
)
```
| 参数 | 默认值 | 说明 |
| -------------- | ------------------------------ | ------------------- |
| `hub_id` | `"github"` | 该中心在接口路径与 URL 中的标识 |
| `display_name` | `"GitHub MCP Registry"` | 在切换列表中显示的名称 |
| `description` | GitHub 官方目录简介 | 名称下方的一句话说明 |
| `icon_url` | GitHub 头像 | 名称旁的图标 |
| `base_url` | `"https://api.mcp.github.com"` | 来源的接口地址 |
| `api_token` | `None` | GitHub 令牌,仅影响调用频率上限 |
| `timeout` | `30.0` | 单次请求超时时间,单位为秒 |
## 快速上手
MCP 中心是 [智能体服务](/versions/2.0.6dev/zh/deploy/agent-service) 的能力之一,因此需要先跑起一个服务和一个前端。请按照 [智能体服务快速上手](/versions/2.0.6dev/zh/deploy/agent-service#试用示例) 的步骤,同时启动仓库自带的 [`examples/agent_service`](https://github.com/agentscope-ai/agentscope/tree/main/examples/agent_service) 后端与 [`examples/web_ui`](https://github.com/agentscope-ai/agentscope/tree/main/examples/web_ui) 前端。
通过 `mcp_hubs` 参数把中心传给 `create_app`,路由、市场页面与安装流程都会随之启用:
```python 注册一个 MCP 中心 theme={null}
from agentscope.app import create_app
from agentscope.app.hub import GitHubMCPHub
app = create_app(
# ...已有代码...
mcp_hubs=[GitHubMCPHub()],
)
```
也可以注册多个,让用户在不同目录之间切换,各自使用独立的 `hub_id`:
```python 注册多个 MCP 中心 theme={null}
app = create_app(
# ...已有代码...
mcp_hubs=[
GitHubMCPHub(),
# 指向自建来源的第二个实例。
GitHubMCPHub(
hub_id="internal",
display_name="内部 MCP 目录",
base_url="https://mcp.corp.example.com",
),
],
)
```
两个 MCP 中心使用同一个 `hub_id` 时,服务会在启动阶段直接报错,而不是静默覆盖其中一个。
重启服务后打开前端的 **MCP** 页面。侧边栏列出已注册的各个中心,以及用户自己的资源池 **Installed MCPs**。选中一个中心,搜索,点开卡片即可查看该服务的功能与所需信息。
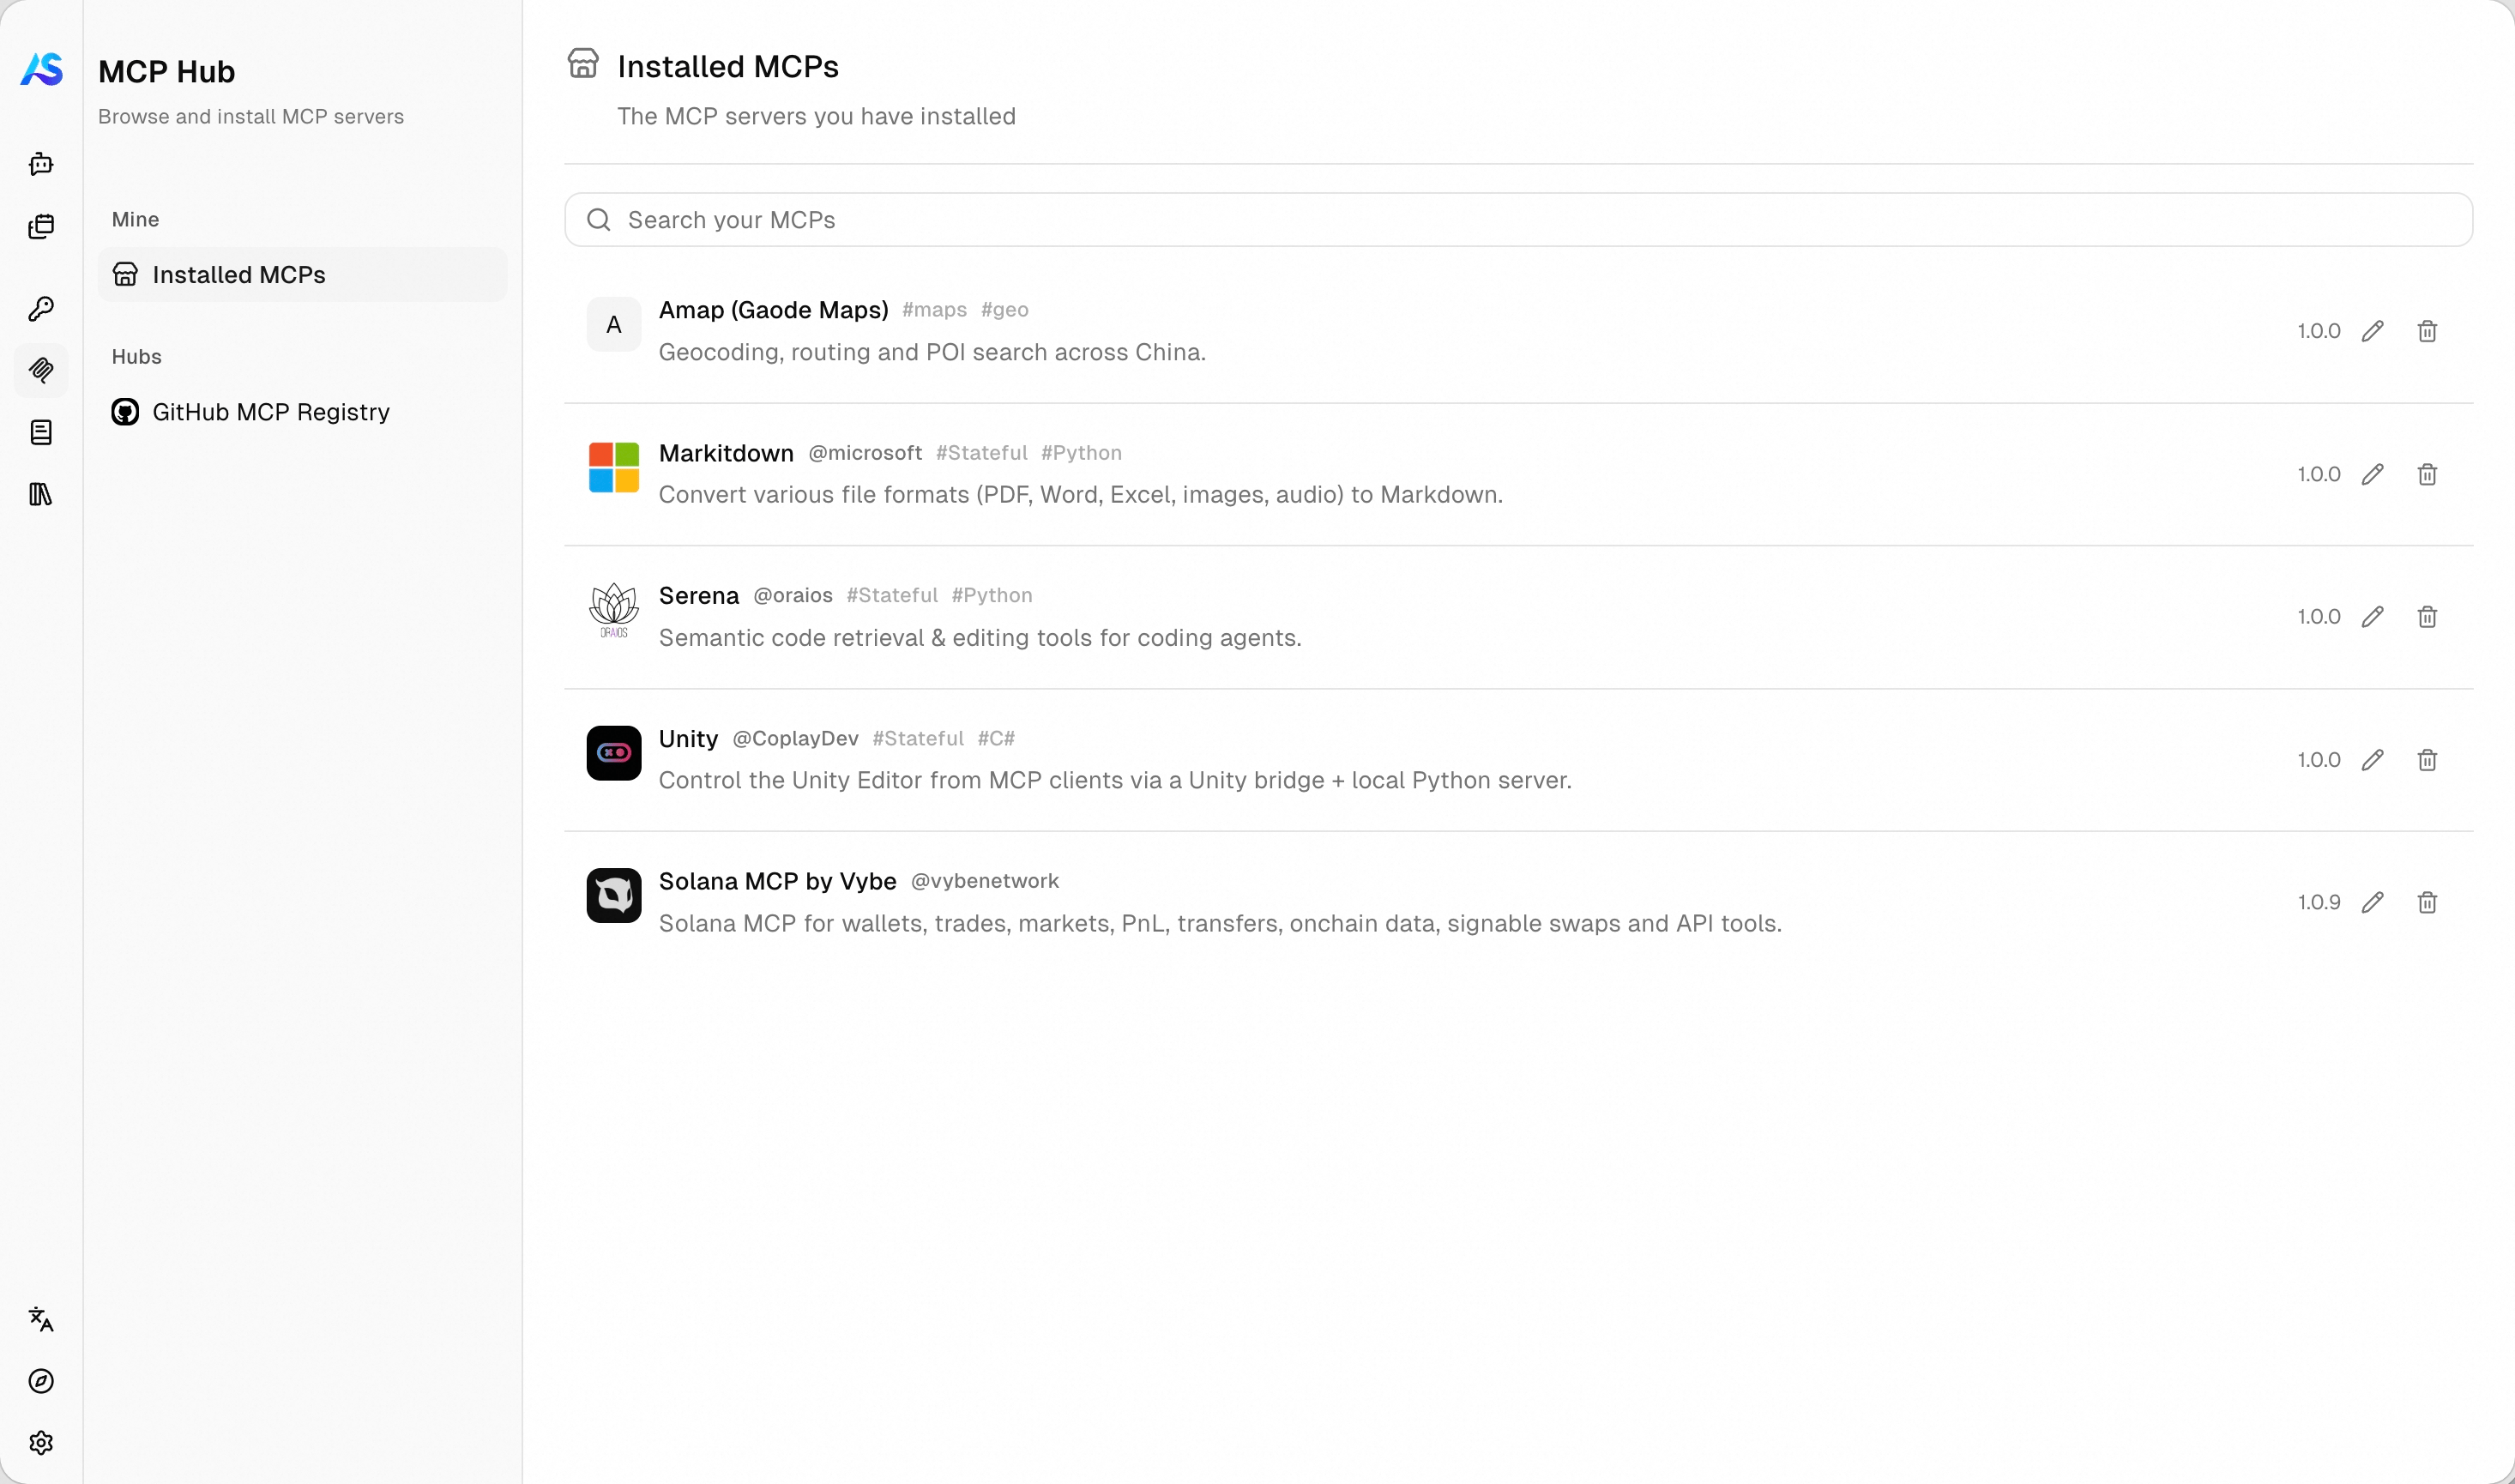
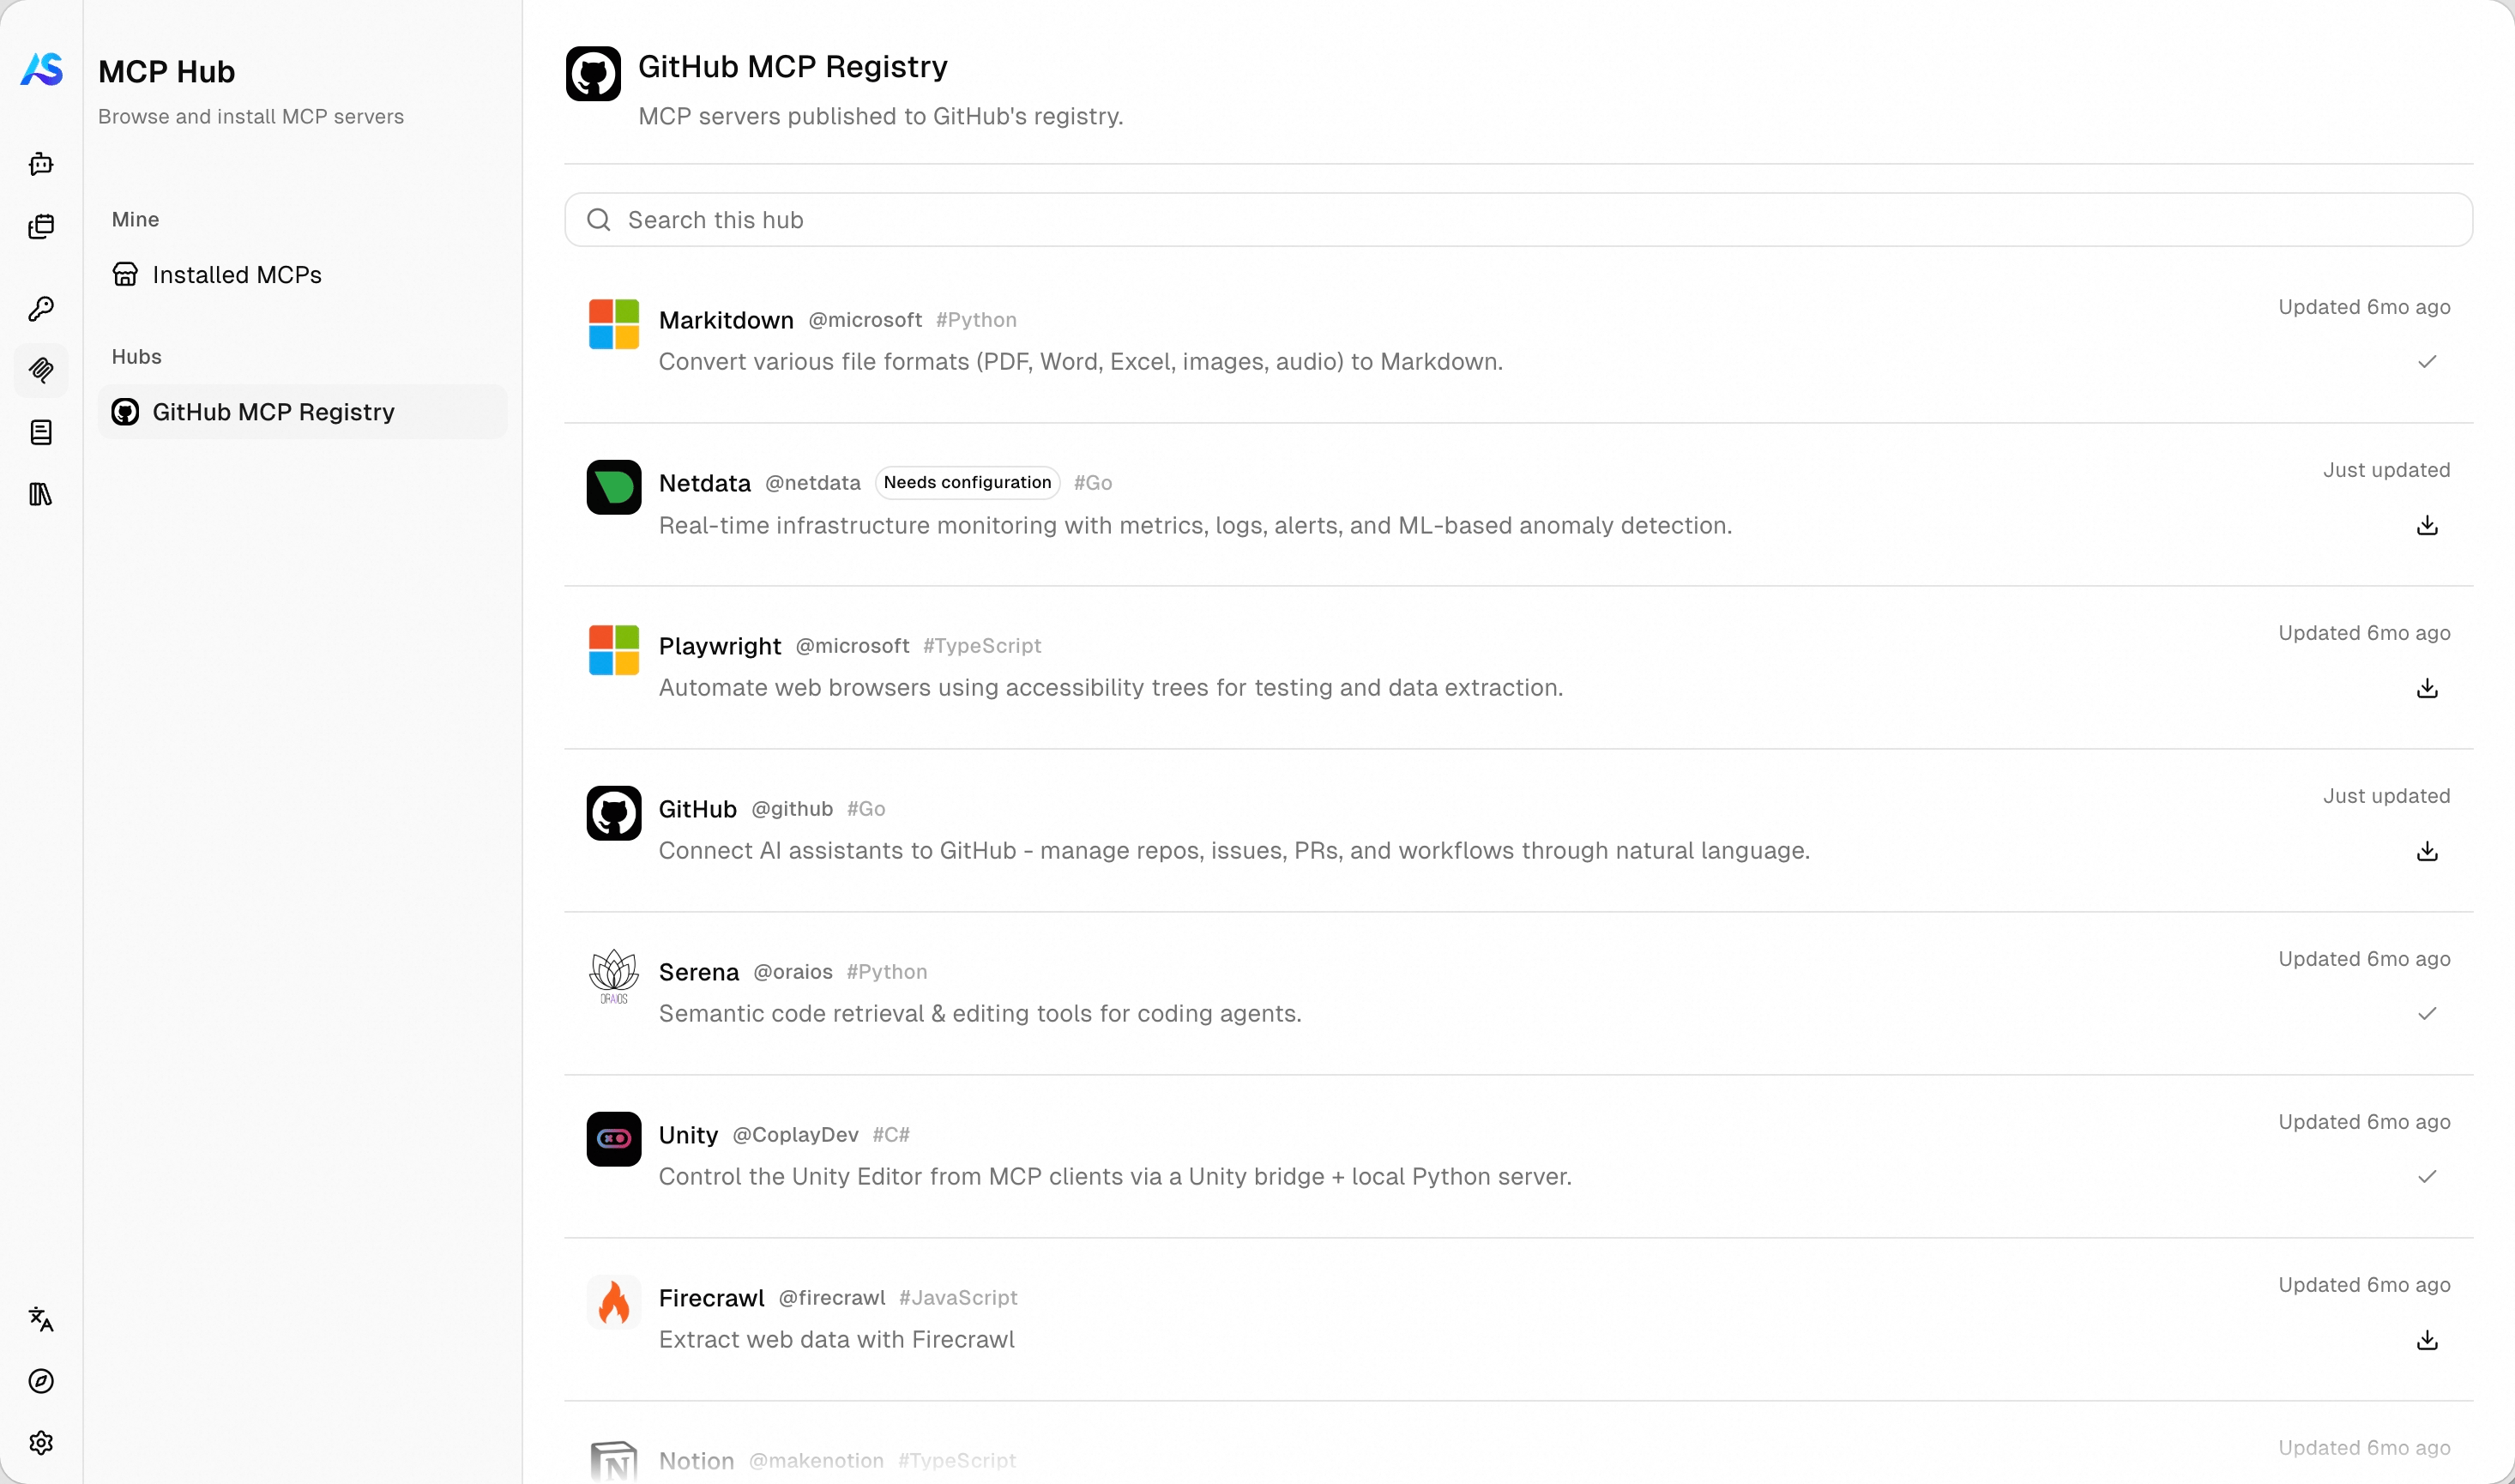 点击 **Install** 会弹出一个根据条目声明自动生成的表单。提交时服务会立刻尝试连接该 MCP 服务,因此凭证填错会当场在表单上报错,而不会安装出一个用不了的条目。安装好的条目都汇总在 **Installed MCPs** 中:
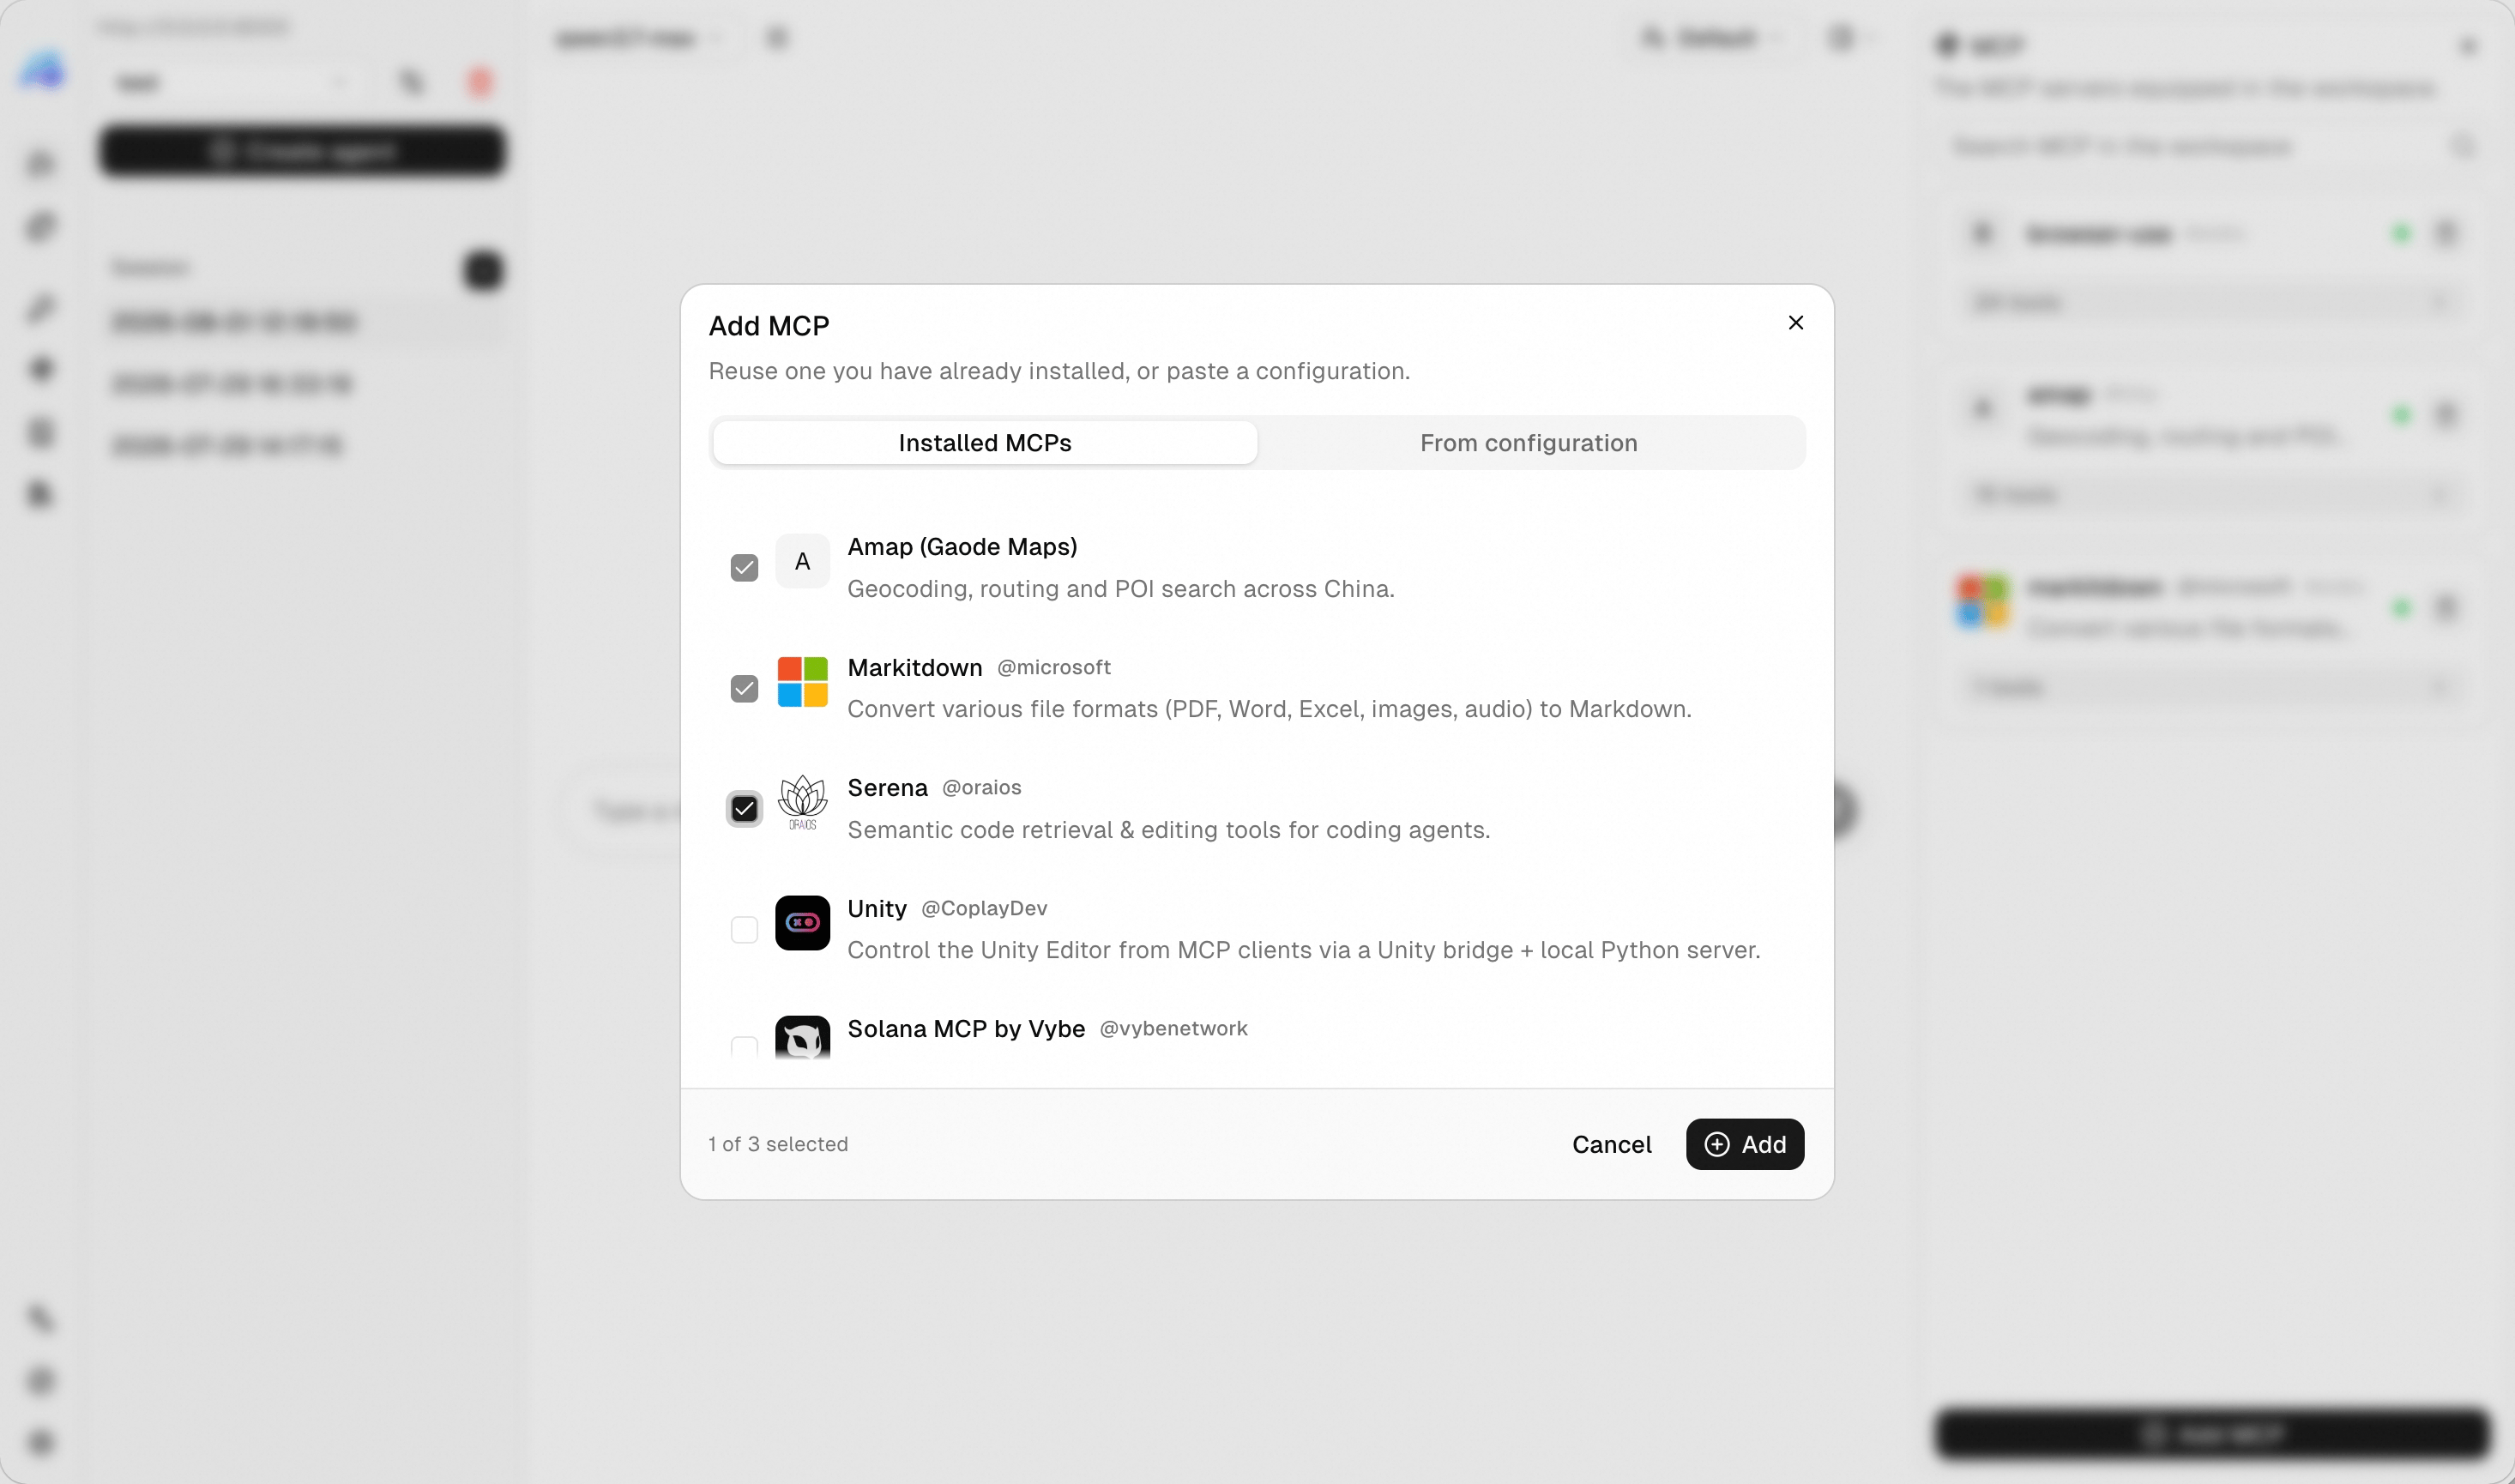
 打开一个会话,展开 **MCP** 面板,点击 **Add**,从 **Installed MCPs** 中勾选。该服务的工具会立即对智能体生效。
 在 **Installed MCPs** 中,用户可以重命名、在保留配置的前提下停用、更新轮换过的密钥,或者直接删除。删除不会影响已经用上它的会话。
## 自定义 MCP 中心
继承 `MCPHubBase` 就能把任意目录接成一个中心:公开的服务目录、公司内部审核过的清单,或者一组固定的自有服务。需要实现两个方法,一个用于浏览,一个用于获取单个条目:
```python 接入内部目录的中心 theme={null}
from agentscope.app.hub import MCPCard, MCPHubBase, MCPHubPage
class InternalMCPHub(MCPHubBase):
"""公司内部审核通过的 MCP 服务。"""
def __init__(self) -> None:
super().__init__(
hub_id="internal",
display_name="内部 MCP 目录",
description="由平台团队审核发布的 MCP 服务。",
)
async def list_mcps(
self,
user_id: str,
# 用户输入的搜索词,为 `None` 时浏览全部。
q: str | None = None,
# 上一页返回的游标,为 `None` 时从第一页开始。
cursor: str | None = None,
limit: int = 20,
) -> MCPHubPage:
"""返回一页条目。"""
page = await fetch_our_catalog(query=q, after=cursor, limit=limit)
return MCPHubPage(
cards=[self._to_card(c) for c in page.items],
# 返回 `None` 表示已无更多内容可加载。
next_cursor=page.next_cursor,
)
async def get_mcp(self, user_id: str, card_id: str) -> MCPCard:
"""返回单个条目,不存在时抛出 `KeyError`。"""
return self._to_card(await fetch_one(card_id))
```
另有两点决定了中心的行为:
| 要点 | 说明 |
| ----- | --------------------------------------------- |
| 游标翻页 | 返回任意能让你续读的字符串即可;目录读完时返回 `None`。前端会在用户滚动时继续加载 |
| 条目不存在 | `get_mcp` 遇到未知 id 时抛出 `KeyError`,服务会将其转换为 404 |
### 按用户控制可见性
两个方法的第一个参数都是 `user_id`,因此同一个目录不必对所有人呈现相同的内容。基于它做筛选,即可实现按团队区分的白名单、依据计费系统的权限开放付费条目,或者让尚未发布的服务只对作者可见:
```python 因用户而异的目录 theme={null}
class InternalMCPHub(MCPHubBase):
async def list_mcps(
self,
user_id: str,
q: str | None = None,
cursor: str | None = None,
limit: int = 20,
) -> MCPHubPage:
"""只返回该用户有权看到的条目。"""
# 由开发者自己的系统判定该用户可安装哪些条目。
allowed = await our_entitlements(user_id)
page = await fetch_our_catalog(query=q, after=cursor, limit=limit)
return MCPHubPage(
cards=[
self._to_card(c) for c in page.items if c.id in allowed
],
next_cursor=page.next_cursor,
)
async def get_mcp(self, user_id: str, card_id: str) -> MCPCard:
"""对隐藏条目同样拒绝,使猜测 id 无法奏效。"""
if card_id not in await our_entitlements(user_id):
raise KeyError(card_id)
return self._to_card(await fetch_one(card_id))
```
`get_mcp` 必须应用与 `list_mcps` 相同的筛选。仅仅让条目不出现在列表里并不构成访问控制:调用方可以用任意猜到的 id 直接请求 `get_mcp`。
### 声明所需的输入项
卡片是一份模板,而不是一个可直接连接的配置。把需要用户填写的部分写成 `${placeholder}`,再用标准 [JSON Schema](https://json-schema.org/) 描述它们,前端就能据此渲染表单:
```python 一个需要填写 API 密钥的卡片 theme={null}
MCPCard(
hub_id=self.hub_id,
id="weather",
name="weather",
display_name="Weather",
description="实时天气与预报。",
config_template=HttpMCPConfig(
url="https://weather.example.com/mcp",
# 占位符在任意字符串中都有效:URL、请求头、环境变量、命令行参数。
headers={"Authorization": "Bearer ${api_key}"},
),
inputs_schema={
"type": "object",
"required": ["api_key"],
"properties": {
"api_key": {
"type": "string",
"title": "API 密钥",
"description": "在账号的「设置 - API」中获取。",
# 渲染为密码输入框,且不会回传给浏览器。
"writeOnly": True,
"format": "password",
},
},
},
)
```
所有凭证字段都必须标注 `"writeOnly": true` 与 `"format": "password"`。前端据此把输入框设为密码框,并在用户后续编辑该条目时留空该字段。
### 复用同一个 HTTP 客户端
中心实例的生命周期与服务同长,因此可以持有一个连接池,而不必每次请求都新建。实现异步上下文管理器的两个方法即可,服务会在启动时进入每个中心,并在关闭时退出:
```python 打开与关闭共享客户端 theme={null}
class InternalMCPHub(MCPHubBase):
async def __aenter__(self) -> "InternalMCPHub":
self._client = httpx.AsyncClient(timeout=30.0)
return self
async def __aexit__(self, *exc: object) -> None:
await self._client.aclose()
```
## 延伸阅读
面向技能的同类能力。
智能体如何调用 MCP 服务的工具。
在 **Installed MCPs** 中,用户可以重命名、在保留配置的前提下停用、更新轮换过的密钥,或者直接删除。删除不会影响已经用上它的会话。
## 自定义 MCP 中心
继承 `MCPHubBase` 就能把任意目录接成一个中心:公开的服务目录、公司内部审核过的清单,或者一组固定的自有服务。需要实现两个方法,一个用于浏览,一个用于获取单个条目:
```python 接入内部目录的中心 theme={null}
from agentscope.app.hub import MCPCard, MCPHubBase, MCPHubPage
class InternalMCPHub(MCPHubBase):
"""公司内部审核通过的 MCP 服务。"""
def __init__(self) -> None:
super().__init__(
hub_id="internal",
display_name="内部 MCP 目录",
description="由平台团队审核发布的 MCP 服务。",
)
async def list_mcps(
self,
user_id: str,
# 用户输入的搜索词,为 `None` 时浏览全部。
q: str | None = None,
# 上一页返回的游标,为 `None` 时从第一页开始。
cursor: str | None = None,
limit: int = 20,
) -> MCPHubPage:
"""返回一页条目。"""
page = await fetch_our_catalog(query=q, after=cursor, limit=limit)
return MCPHubPage(
cards=[self._to_card(c) for c in page.items],
# 返回 `None` 表示已无更多内容可加载。
next_cursor=page.next_cursor,
)
async def get_mcp(self, user_id: str, card_id: str) -> MCPCard:
"""返回单个条目,不存在时抛出 `KeyError`。"""
return self._to_card(await fetch_one(card_id))
```
另有两点决定了中心的行为:
| 要点 | 说明 |
| ----- | --------------------------------------------- |
| 游标翻页 | 返回任意能让你续读的字符串即可;目录读完时返回 `None`。前端会在用户滚动时继续加载 |
| 条目不存在 | `get_mcp` 遇到未知 id 时抛出 `KeyError`,服务会将其转换为 404 |
### 按用户控制可见性
两个方法的第一个参数都是 `user_id`,因此同一个目录不必对所有人呈现相同的内容。基于它做筛选,即可实现按团队区分的白名单、依据计费系统的权限开放付费条目,或者让尚未发布的服务只对作者可见:
```python 因用户而异的目录 theme={null}
class InternalMCPHub(MCPHubBase):
async def list_mcps(
self,
user_id: str,
q: str | None = None,
cursor: str | None = None,
limit: int = 20,
) -> MCPHubPage:
"""只返回该用户有权看到的条目。"""
# 由开发者自己的系统判定该用户可安装哪些条目。
allowed = await our_entitlements(user_id)
page = await fetch_our_catalog(query=q, after=cursor, limit=limit)
return MCPHubPage(
cards=[
self._to_card(c) for c in page.items if c.id in allowed
],
next_cursor=page.next_cursor,
)
async def get_mcp(self, user_id: str, card_id: str) -> MCPCard:
"""对隐藏条目同样拒绝,使猜测 id 无法奏效。"""
if card_id not in await our_entitlements(user_id):
raise KeyError(card_id)
return self._to_card(await fetch_one(card_id))
```
`get_mcp` 必须应用与 `list_mcps` 相同的筛选。仅仅让条目不出现在列表里并不构成访问控制:调用方可以用任意猜到的 id 直接请求 `get_mcp`。
### 声明所需的输入项
卡片是一份模板,而不是一个可直接连接的配置。把需要用户填写的部分写成 `${placeholder}`,再用标准 [JSON Schema](https://json-schema.org/) 描述它们,前端就能据此渲染表单:
```python 一个需要填写 API 密钥的卡片 theme={null}
MCPCard(
hub_id=self.hub_id,
id="weather",
name="weather",
display_name="Weather",
description="实时天气与预报。",
config_template=HttpMCPConfig(
url="https://weather.example.com/mcp",
# 占位符在任意字符串中都有效:URL、请求头、环境变量、命令行参数。
headers={"Authorization": "Bearer ${api_key}"},
),
inputs_schema={
"type": "object",
"required": ["api_key"],
"properties": {
"api_key": {
"type": "string",
"title": "API 密钥",
"description": "在账号的「设置 - API」中获取。",
# 渲染为密码输入框,且不会回传给浏览器。
"writeOnly": True,
"format": "password",
},
},
},
)
```
所有凭证字段都必须标注 `"writeOnly": true` 与 `"format": "password"`。前端据此把输入框设为密码框,并在用户后续编辑该条目时留空该字段。
### 复用同一个 HTTP 客户端
中心实例的生命周期与服务同长,因此可以持有一个连接池,而不必每次请求都新建。实现异步上下文管理器的两个方法即可,服务会在启动时进入每个中心,并在关闭时退出:
```python 打开与关闭共享客户端 theme={null}
class InternalMCPHub(MCPHubBase):
async def __aenter__(self) -> "InternalMCPHub":
self._client = httpx.AsyncClient(timeout=30.0)
return self
async def __aexit__(self, *exc: object) -> None:
await self._client.aclose()
```
## 延伸阅读
面向技能的同类能力。
智能体如何调用 MCP 服务的工具。